You can Bulk Add Alias With PowerShell to multiple mailboxes in one go. PowerShell, as a robust automation tool, offers a streamlined solution for this task. This guide introduces a PowerShell script tailored to bulk add aliases to mailboxes, enhancing the efficiency of your Exchange administration.
Table of Contents
Bulk Add Alias With PowerShell
Efficient mailbox management involves the ability to add aliases to multiple mailboxes effortlessly. PowerShell empowers administrators to perform such tasks with ease. This guide explores a PowerShell script designed specifically for bulk adding aliases to mailboxes, simplifying the mailbox administration process.
Need for the Script
Adding aliases to mailboxes in bulk holds significance for several reasons:
- Time Efficiency: Streamlining the process of adding aliases to multiple mailboxes saves valuable time for administrators.
- Consistency: Ensuring consistency in alias assignment across mailboxes enhances organization-wide uniformity.
- Automation Benefits: Harnessing the power of PowerShell automation enables efficient handling of mailbox-related tasks.
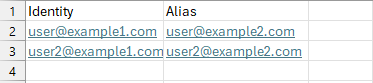
CSV Format
Ensure the CSV file contains two columns: “Identity” and “Alias.”
Modifications
Make sure to replace C:\Path\To\Your\File.csv with the actual path to your CSV file, ensuring it contains two columns: “Identity” and “Alias.” This location should be accessible and follow the correct CSV format for successful execution.
Connecting with Exchange Online
Before delving into the script, establishing a connection with Exchange Online is crucial. This ensures that subsequent operations are performed within the Exchange Online environment.
Module Installation
To interact with Exchange Online services using PowerShell, the appropriate module needs to be installed. Execute the following command to facilitate the installation:
Install-Module -Name ExchangeOnlineManagement -Force -AllowClobberImport Module and Connect
Once the module is installed, import it into the PowerShell session and establish a connection with Exchange Online:
Import-Module ExchangeOnlineManagement
Connect-ExchangeOnline -UserPrincipalName <YourUPN> -ShowProgress $true
Replace <YourUPN> with your Exchange Online user principal name.
Script Writing
Paste the script in powershell and run to execute, it will add alias to all the users mentioned in csv.
$Recipients = Import-Csv D:\c2.csv
Foreach ($Item in $Recipients)
{
    Set-Mailbox -Identity $Item.Identity -EmailAddresses @{Add=$Item.Alias}
}
Conclusion
In conclusion, the provided PowerShell script simplifies the process of bulk adding aliases to mailboxes in Exchange Online. By following the outlined steps, administrators can enhance the efficiency of mailbox management, ensuring consistency, and saving valuable time. Embrace the power of PowerShell automation for streamlined Exchange administration.