Adding Bulk Users to a Distribution List with PowerShell becomes handy, When it comes to managing users in Exchange Online, PowerShell proves to be a robust ally. In this guide, we’ll walk through the process of efficiently adding multiple users to a distribution list using PowerShell. Buckle up as we streamline your Exchange Online management with step-by-step instructions and empower your workflow with this powerful and versatile solution.
Table of Contents
Connecting to Exchange Online
Before diving into the script, establishing a connection to Exchange Online is paramount. The Connect-ExchangeOnline cmdlet facilitates this connection, ensuring that subsequent operations are executed in the Exchange Online environment.
Installing the Exchange Online PowerShell Module:
If you haven’t installed the Exchange Online PowerShell module, it’s essential to do so before attempting to connect. See detailed article on it here.
Run the following command to install the module:
Install-Module -Name ExchangeOnlineManagement -Force -AllowClobber

Importing the Module:
Importing the Module:
Once the module is installed, import it into your PowerShell session using the following command:
Import-Module ExchangeOnlineManagementThis step makes the cmdlets from the Exchange Online PowerShell module available for use in your current session.
Connecting to Exchange Online:
Now, you are ready to establish a connection to Exchange Online. Execute the Connect-ExchangeOnline cmdlet and provide your Office 365 credentials when prompted:
Connect-ExchangeOnline -UserPrincipalName <YourUPN> -ShowProgress $trueReplace <YourUPN> with your Office 365 user principal name.
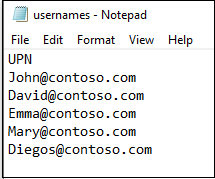
Preparing the CSV File:
A well-structured CSV file is the cornerstone of this operation. Each row should contain the user’s User Principal Name (UPN), ensuring clarity and precision in identifying the users to be added to the distribution list.
Save the csv at your desired location and make sure to change the location in script.
Executing the PowerShell Script:
The core of this process lies in the PowerShell script. It systematically imports the CSV file and adds users to the specified distribution list. The Add-DistributionGroupMember cmdlet plays a pivotal role in this step.
Make sure to change the name of Distribution list in the script.
# Connect to Exchange Online
Connect-ExchangeOnline
# Import CSV and add users to distribution list
Import-CSV E:\username.csv | foreach {
    $UPN = $_.UPN
    Write-Progress -Activity "Adding $UPN to group… "

    # Add user to distribution list
    Add-DistributionGroupMember –Identity NameOfDistributionList -Member $UPN

    # Check for success and display messages
    If ($?) {
        Write-Host "$UPN successfully added to NameOfDistributionList ." -ForegroundColor Green
    } Else {
        Write-Host "Error occurred while adding $UPN." -ForegroundColor Red
    }
}
Workflow Of “Adding Bulk Users to a Distribution List” Script
- Connect to Exchange Online:
Connect-ExchangeOnline: This initiates a connection to Exchange Online, prompting the user for Office 365 credentials. Once authenticated, it establishes a session for subsequent operations within the Exchange Online environment.
- Import CSV and Iterate Through Users:
Import-CSV E:\LL.csv | foreach { ... }: This command reads data from the CSV file located at E:\LL.csv and iterates through each row using a foreach loop.
- User Principal Name (UPN) Extraction:
$UPN = $_.UPN: For each iteration, it extracts the User Principal Name (UPN) from the current row of the CSV and stores it in the variable$UPN.
- Display Progress:
Write-Progress -Activity "Adding $UPN to group… ": This displays a progress bar, providing a visual indication of the ongoing process. The activity text dynamically includes the current UPN being processed.
- Add User to Distribution List:
Add-DistributionGroupMember –Identity WholeSchool -Member $UPN: This cmdlet adds the user specified by the UPN to the distribution group named “WholeSchool” in Exchange Online.
- Check for Success and Display Messages:
If ($?) { ... }: This checks if the last operation (adding the user) was successful.Write-Host "$UPN successfully added to WholeSchool." -ForegroundColor Green: If successful, it displays a green success message indicating that the user was added to the distribution list.Else { ... }: If an error occurs during the operation, it displays a red error message indicating that an issue occurred while processing the current UPN.
Monitoring Progress
The script provides a real-time progress update, ensuring transparency in the user addition process. Successful and unsuccessful additions are clearly highlighted, allowing for immediate identification of any issues.
Conclusion
In conclusion, leveraging PowerShell for adding bulk users to a distribution list in Exchange Online proves to be a game-changer. This efficient and scalable solution not only enhances productivity but also ensures accuracy in user management. As you embark on this PowerShell journey, empower your Exchange Online administration with a tool that simplifies complexity and streamlines your workflow effortlessly.